Verify Guide
This guide helps administrators and users to get the most out of the Verify consent manager.
Roles
The following roles are available in Verify. You can assign multiple roles to a user depending on their role within the project and the organization. This way you can fully set up/customize Verify users according to your own wishes.
In practice, we usually see 3 roles in the process:
1- The administrator: they take care of the setup and configuration of digital consent forms, fields, permissions and portal settings.
2- The project manager: they create projects for photo shoots, choose the appropriate permission forms and can assign users to their project, link permissions to images and export their project photos to the DAM.
3- The photographer: they make sure that models have signed their digital consents and upload the photos in the project.
Type of roles
Project uploading
Only sees projects for which it has been added as a stakeholder
Can upload images
Can add consent of models via the QR code
Can view/check model list consent statuses
Can delete uploaded images (which do not have permission/model linked to them)
Project editing
Only sees projects for which it has been added as a stakeholder
Can add consent of models via the QR code
Can view/check model list consent statuses
Can view/check consent and link them to images
Can mark images with consent ‘verified’ status
Project management
Sees projects for which he has been added as a stakeholder and self-created projects
Can add consent of models via the QR code
Can view/check model list consent statuses
Can create your own project and can modify and delete projects
Can revoke consent for models yourself
Can send project extension requests to models
Project admin
Sees all projects in Verify
Can add consent of models via the QR code
Can view/check model list consent statuses
Can create and manage consent templates for forms
Can create and manage custom fields for projects and models
User management
Only sees projects for which he has been added as a stakeholder
Can add consent of models via the QR code
Can view/check model list consent statuses
Can change user roles, add (invite) and remove usersCan adjust tennant settings for own logo on the portal and logo, name, website url in email notifications
Project export
Sees only projects for which it has been added as a stakeholder
Can add consent of models via the QR code
Can view/check model list consent statuses
Can select images, export them to the DAM
Project download
Sees only projects for which it has been added as a stakeholder
Can add consent of models via the QR code
Can view/check model list consent statuses
Can select images and download them
Type of users
We distinguish 2 users within Verify. Local users: these are usually users from outside the organization. These users will receive an invitation email to create their own account. These invitations are managed by the Verify administrators within the organization with the user management role. In addition, there is the possibility to log in via Single Sign On for employees of your own organization. They can then log in with their Microsoft account.
Activate and manage your own account
Activate your Account
You have received an invitation email from Verify with a link to the Verify consent manager. Here you can activate your own account (email address) by logging in with your temporary password. If you don’t see the email, please check the spam folder to be sure.
User profile
In Verify, you can edit your own account in the right-hand menu under profile. Here you can choose your language for the portal and change your password yourself.
Screenshot ‘User profile’

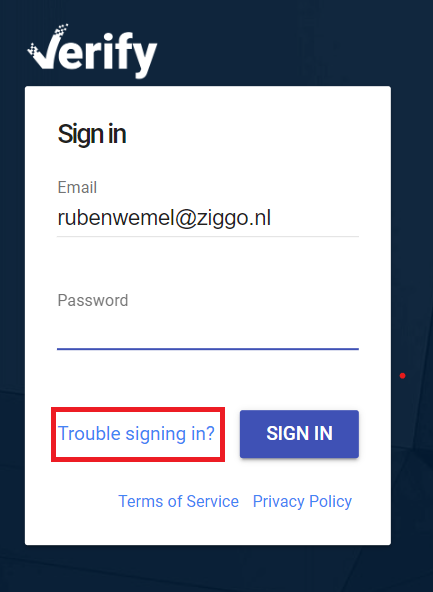
Forgot Password
If you have forgotten your password, you can click on the ‘trouble signing in’ button after entering your email address. Then click on ‘send’ to receive an email to change your password.
Screenshot ‘recover password’

Administrator’s Guide for Project Admins
User management
Go to the Verify Consent Manager page and login. As a project admin, you can invite new (external users) and manage users here. If you work with SSO, you don’t need to create accounts for your own internal users. In user management, you can create new users and assign them the right role.
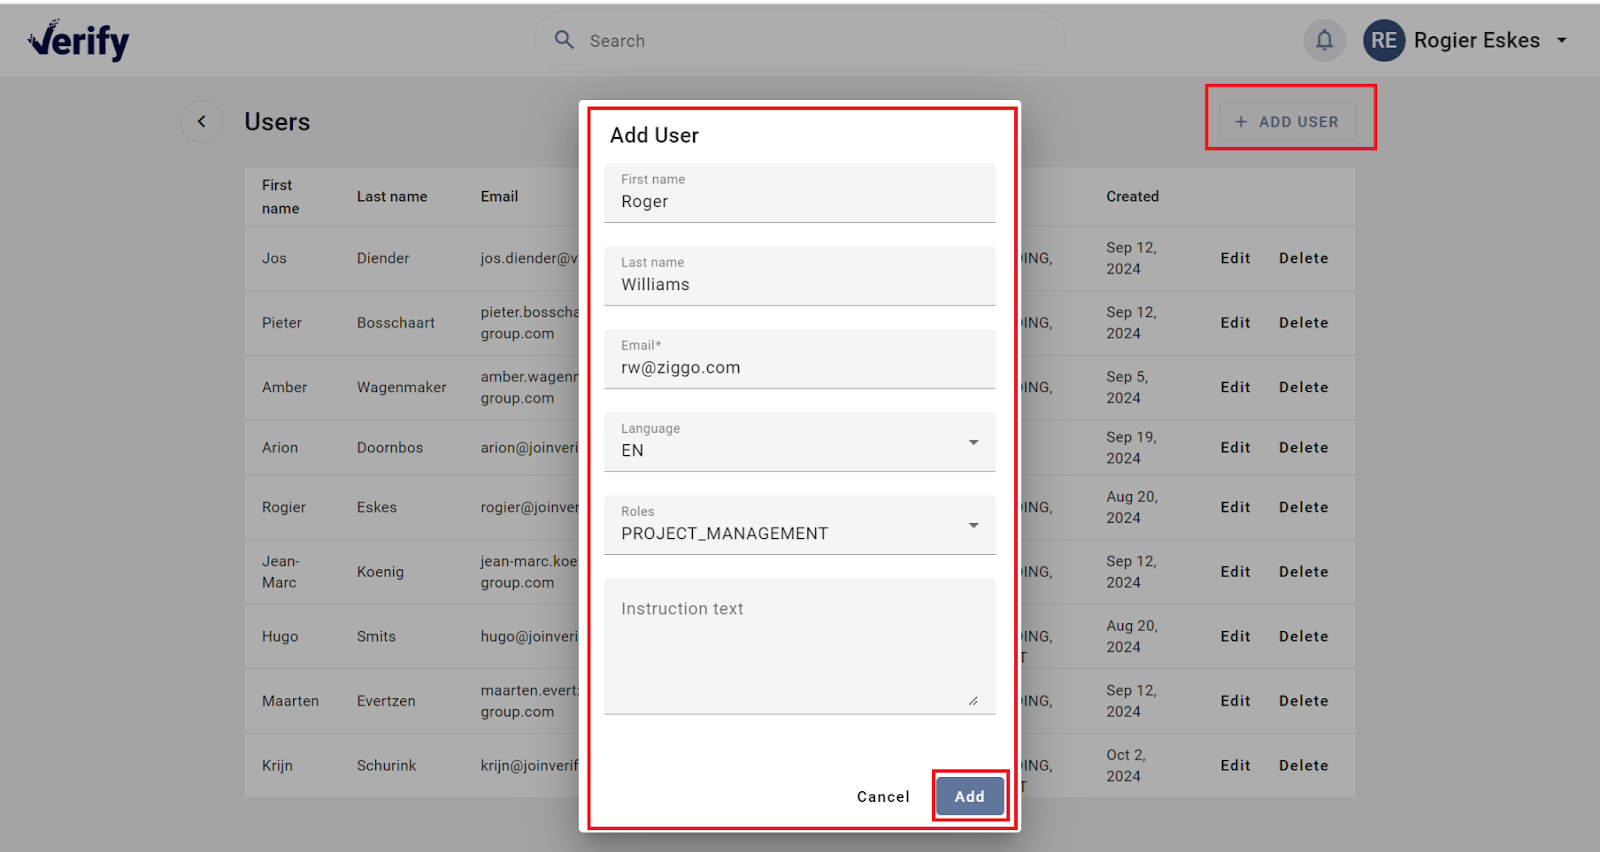
Screenshot ‘User management’

You can create a user via the ‘add user’ button. Fill in the name fields and the correct email address, then you can choose which language the portal should have for this user and finally you give the user the right role (in this example, project uploading because it is an external photographer). Once you’ve added users, they’ll receive an invitation email from Verify with a temporary password and a link to the portal. So that they can activate their account.
Screenshot ‘add user’
You can also change the roles for users in the user management by clicking on ‘edit’ and you can remove users from the system.
Create and manage your own custom fields
If desired, you can create and manage your own Verify project and model fields.
In addition to the standard Verify fields for projects and models as shown below, you can add your own fields to the project and to the model. You can then also insert these custom fields as variables in your various form templates.
Screenshot ‘Project fields’
Screenshot ‘Model form fields’
Adding custom fields
In the menu at the top right, click on ‘custom fields’ and this will take you to the page where you can add and manage the custom fields for projects and models.
Screenshot ‘Manage Custom fields’
Now you can click on the button ‘+ add field’ in model fields (this field is added and shown when filling in the consent form by models) or project fields (this field is added and shown when filling in project details).
-Enter the name for the custom field
-Select the type of field
-Enter a description
-Specify if field is required to fill in
-Click ‘add’ to add field


Screenshot ‘Add custom fields’
Setting permissions for export to the DAM (image bank) export
Now that all stakeholders and custom fields have been created in Verify, you will need to make sure that the correct permissions are set within Verify for projects. When creating a project, project managers are then required to choose the desired permission(s).
When exporting the project, Verify will create these permission(s) in the DAM solution and assign them to the exported collections and selected assets.
By default, we recommend working with at least one permission: ‘Verify consent manager’. Only Key users/admins who have this permission will see these projects as a collection and associated assets in the image bank and can make the images available in the image bank in a controlled manner. Make sure that you grant these permission(s) to all key users in your DAM solution as well.
For larger organizations with brands / faculties that only want to see their own projects, you can create multiple permissions for example: ‘Verify consent Erasmus Corporate’, ‘Verify consent Erasmus RSM’ etc.’Verify consent Axians’, ‘Verify consent VINCI Energies’ etc.’Verify consent Roosendaal’, ‘Verify consent Roosendaal CM’ etc.
Adding permissions
In the menu at the top right, click on ‘custom fields’ and this will take you to the page where you can add and manage the custom fields for projects and models.
Then, under ‘project fields’, click on ‘+ Add field’. Then the popup will appear here in which you perform the following steps:
-Enter field name ‘Permissions’
-Choose field type permissions
-Enter an explanation/description for the field that will be shown to the model
-Click on that field is required- Add the necessary permissions
-Click on add
Screenshot ‘Add permissions’

Create and manage consent form templates
Now that all stakeholders have created custom fields and permissions in Verify, you’ll need to make sure that the correct consent forms are set up as digital templates. This will allow models to give and withdraw digital consent via the digital form via a QR code.
Create and manage template
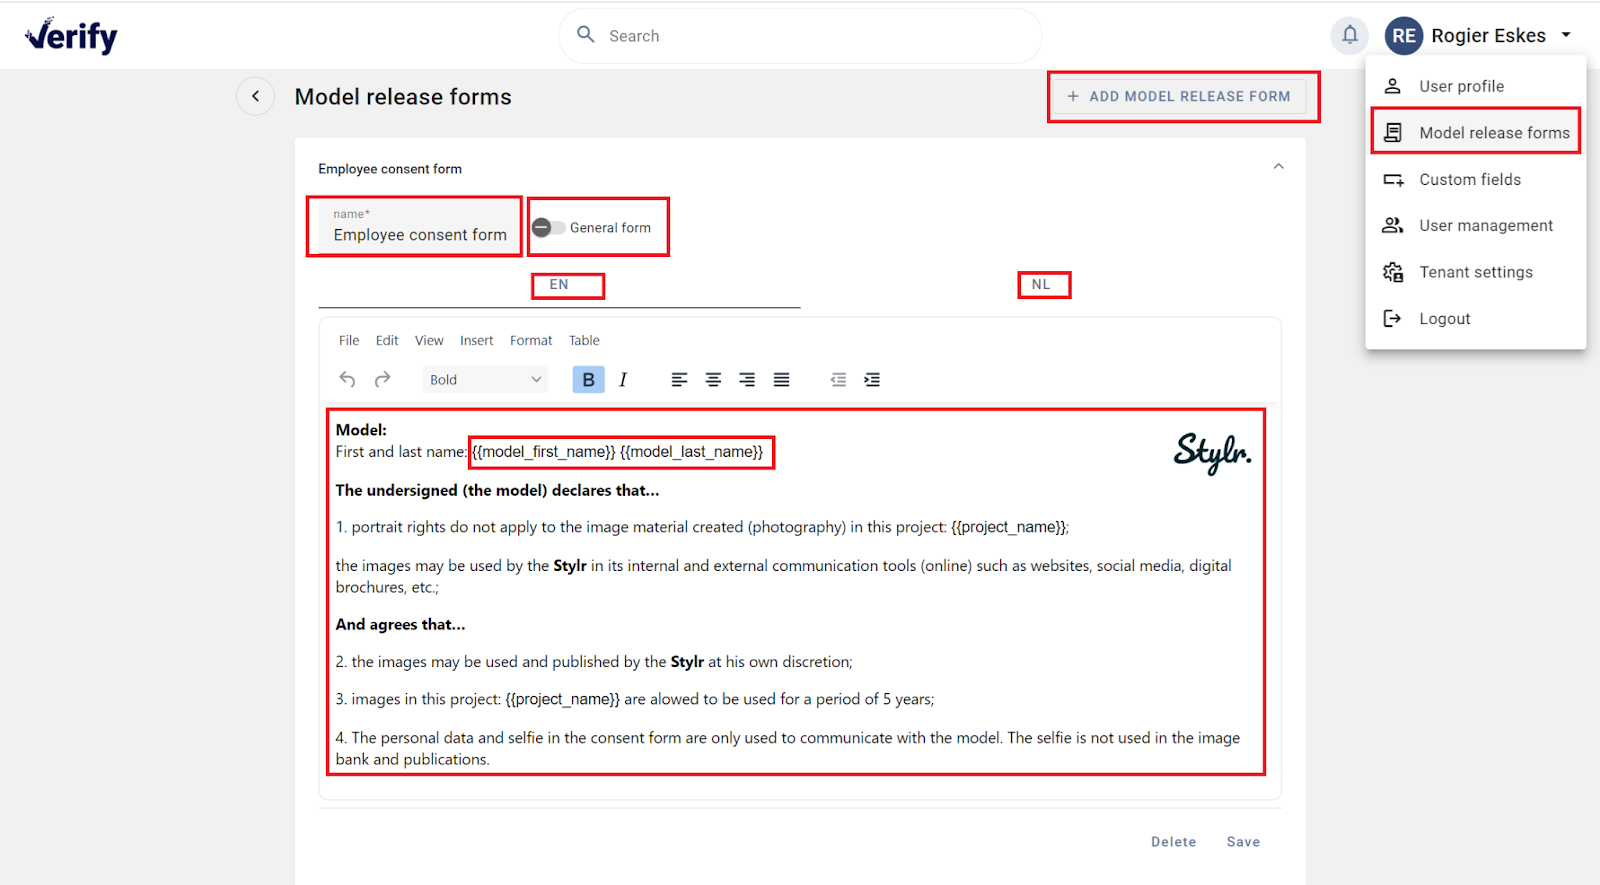
In the menu at the top right, click on ‘model release forms’ and this will take you to the page where you can create and manage the templates.
Via the button ‘+ add model release form’ you can create a new template.
– You fill in the name for the form
– Keep the toggle ‘general form’ turned off
– Click on the ‘EN’ tab to enter English text if you also use English consent forms. If you leave it blank, the EN variant will be invisible to users.
– Click on the ‘NL’ tab to enter Dutch text if you are using the NL consent forms. If you leave it blank, the NL variant will be invisible to users.
– Click on ‘save’ to add the form template and save later changes.
Note: If you want to delete a form, click on ‘delete’ to delete the form template.
Screenshot ‘Add model release forms’
Adding variable fields in form template
In the text box you can add your own consent texts in the chosen language (EN or NL). Here you have the option to add Verify standard fields and custom fields that are filled in by the project manager or the fields that are filled in by the model at signing as a variable in the form template.
Adding standard variable fields in form template
You can do this by putting these variables in the text in double brackets as shown in the print screen below.
The following Verify fields are available by default:
{{project_name}} = the name of the project filled in by the project manager
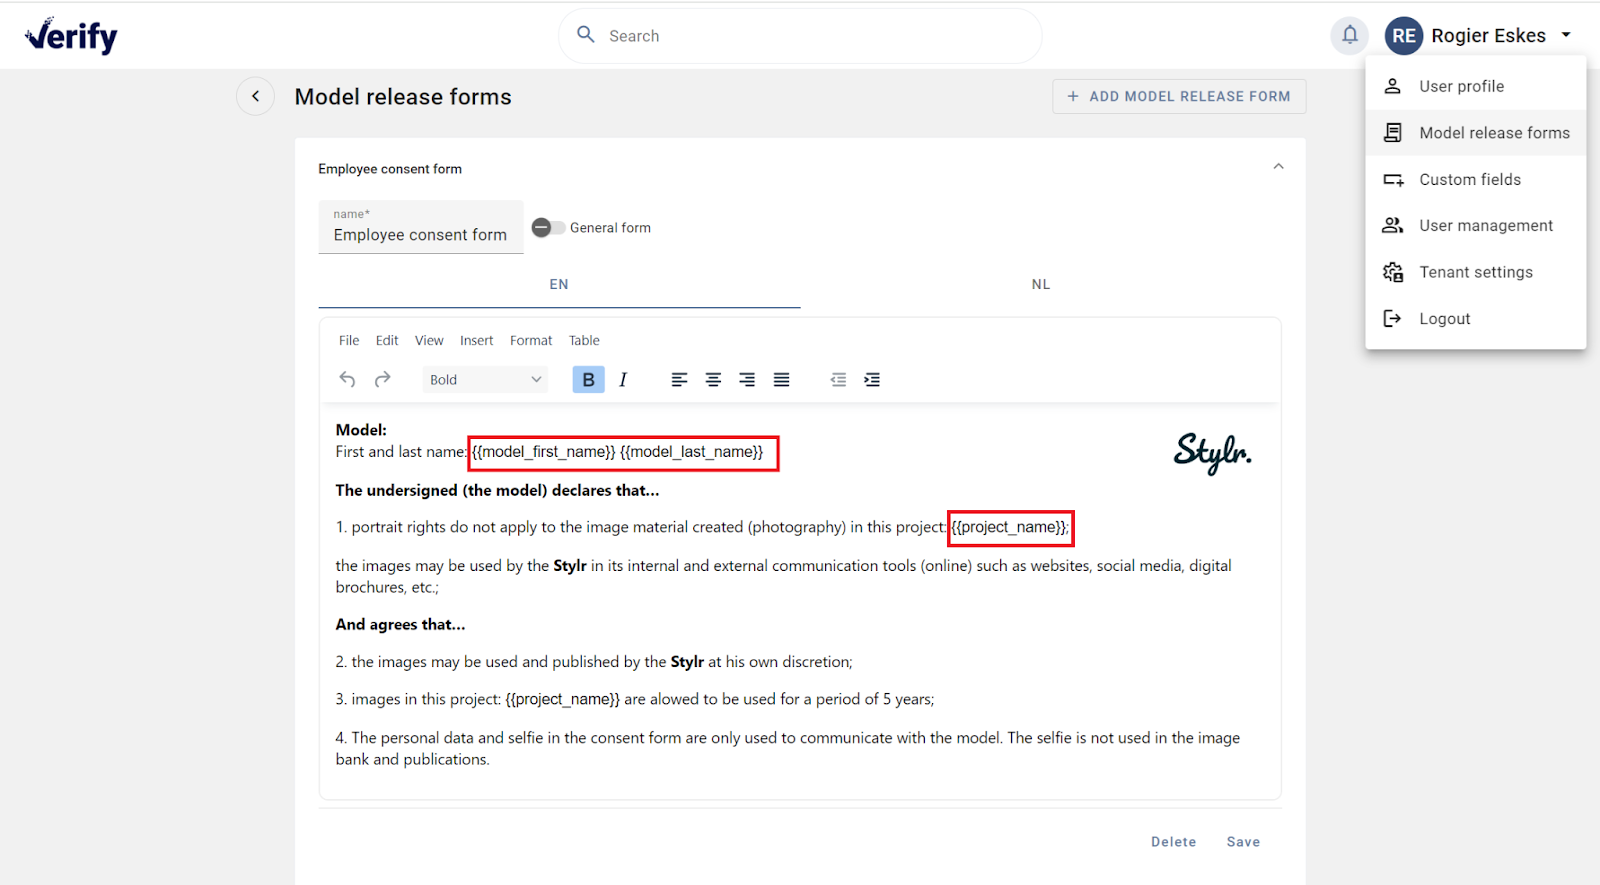
{{project_description}} = the description of the project completed by the project manager
{{model_first_name}} =first name filled in by the model in form
{{model_last_name}} = surname entered by the model in form
{{model_email}} =email filled in by the model in form
{{project_photoshoot_date}} =photoshoot date set for project by project manager
{{current_date}} =date on which model form was signed
**If you want to use signing via E-signing solutions such as ValidSign or Docusign, please contact us at info@joinverify.com
Adding custom variable fields in form template
You can do this by putting these variables in brackets in the desired place in the form as shown below:
For custom project fields , add them in the form as follows, filling in the name of your own field which will replace the bold ‘field name’ = {{project{field name}}}
For custom model fields , add them in the form as follows, filling in the name of your own field which will replace the bold ‘field name’ = {{model{field name}}}
General consent templates without expiry date
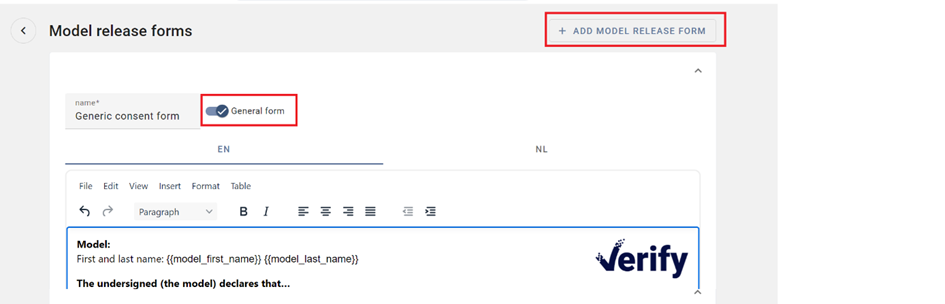
For specific purposes (e.g. a mayor or rector magnificus which participates in multiple photoshoots) you want models to give a generic consent so their consent can be used in different projects without having to give consent each time per project.
As a project admin you need to configure this in the following way. Go to ‘model release forms’ here ‘add new model release form’ with the respective content. Click on the toggle ‘general form’ and save your form.
Screenshot ‘configure general form’
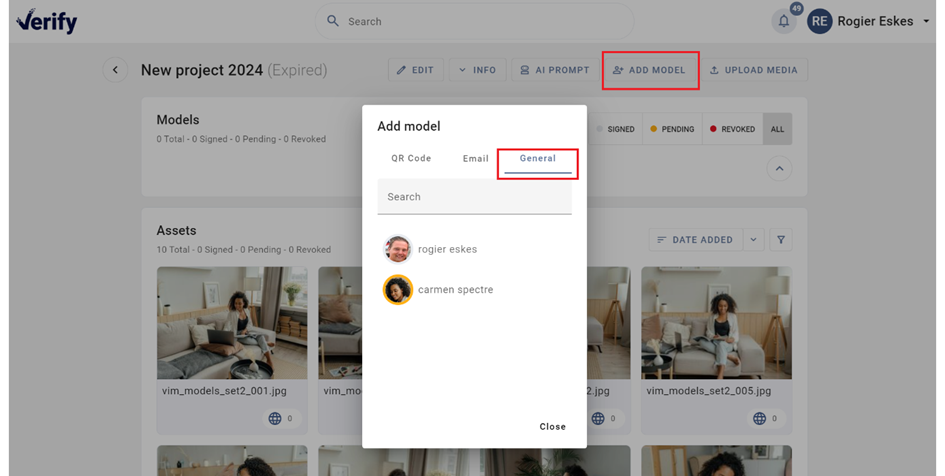
Models who scanned and signed these templates can be used in multiple projects without having to sign off their consent for each project. These models only need to be revoked when they leave employment or when they withdraw their consent themselves. You can add generic models to all projects by clicking on the ‘general model’ tab.
Screenshot ‘add generic model consent to a project’
Tennant settings custom logo for portal and email notifications
Tennant settings for Logo & organization name
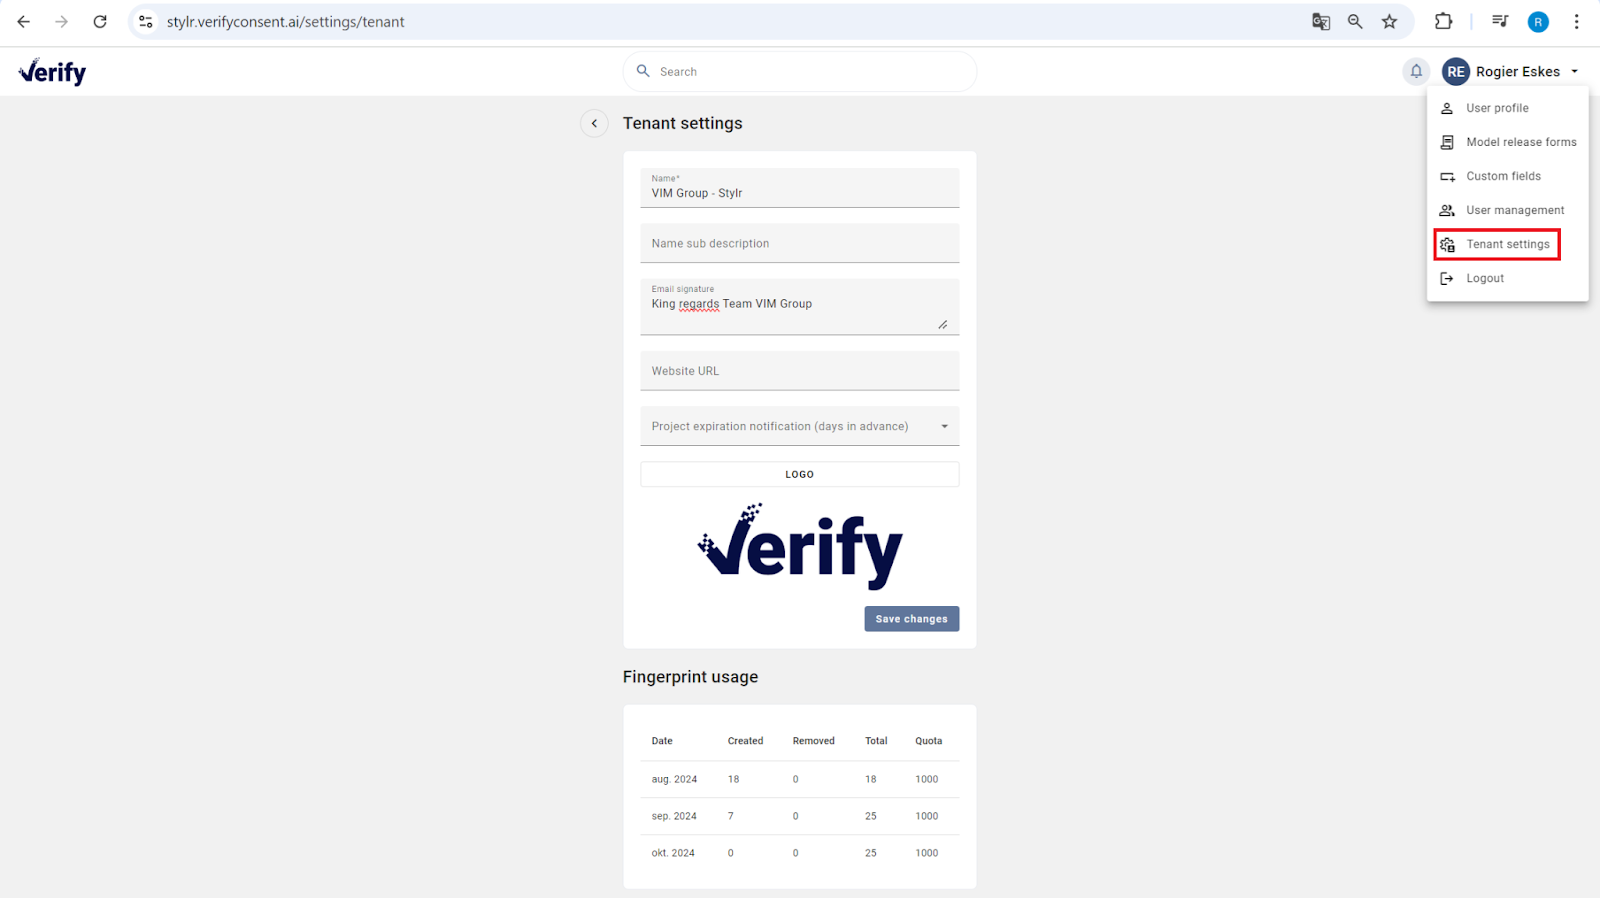
As an administrator, click on ‘tennant settings’ in the menu at the top right.
Print screen ‘tenant settings’
In the tenant settings, as a customer, you can set your own logo, (organization) name, sub name, website URL and email signature. The logo is displayed in the portal. The organization name, subnamem logo, website URL and exmail signature will be used in the email notifications that Verify sends out. In this way, you can adjust the email notifications to your own organization needs. See the print screens below.

Print screen ‘tenant fields to customize email notifications’
Print screen ‘the logo in the portal’
Setting notification term for expiring projects
You can set a deadline here for how many days in advance project managers should receive a notification email before the expiration date of the approval of their project(s), so that they can take action on it.
Print screen ‘set project expiry notification period’

Manual for project managers (key user / faculty admin)
4.1 Create and manage projects project manager
Now that you’ve created all the stakeholders, custom fields, permissions, and the necessary consent form templates, you can get started with creating your photoshoot projects.
Create a project
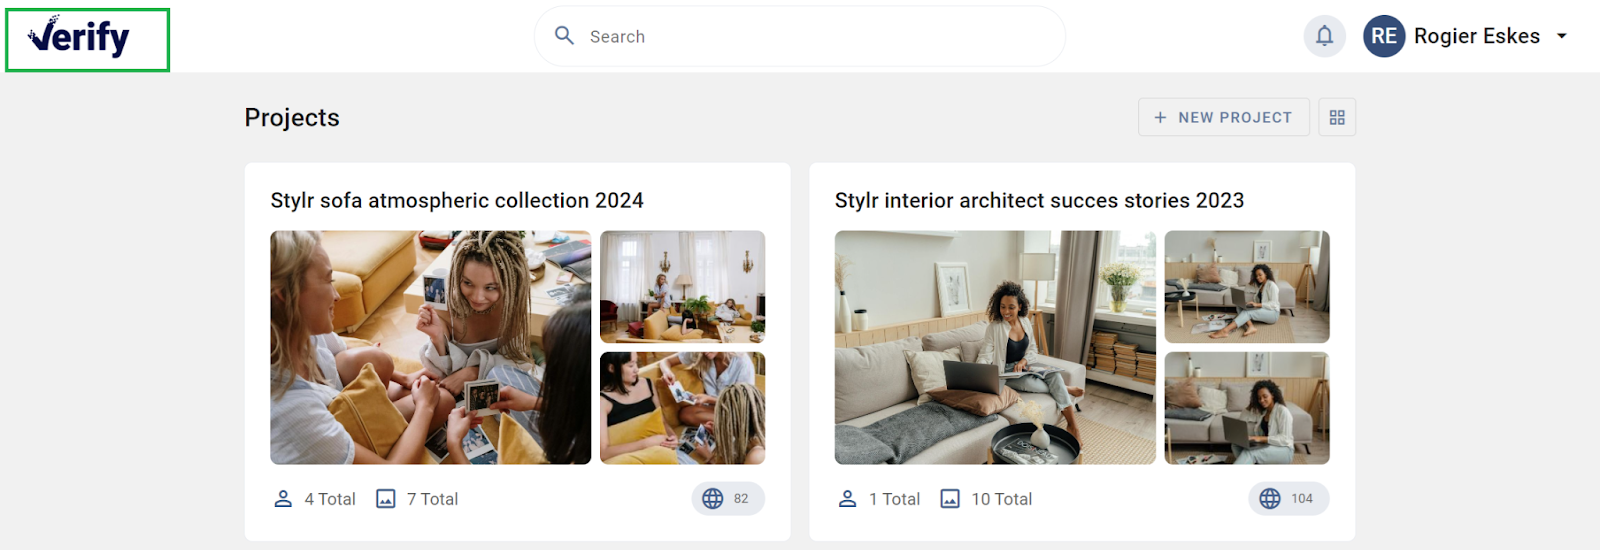
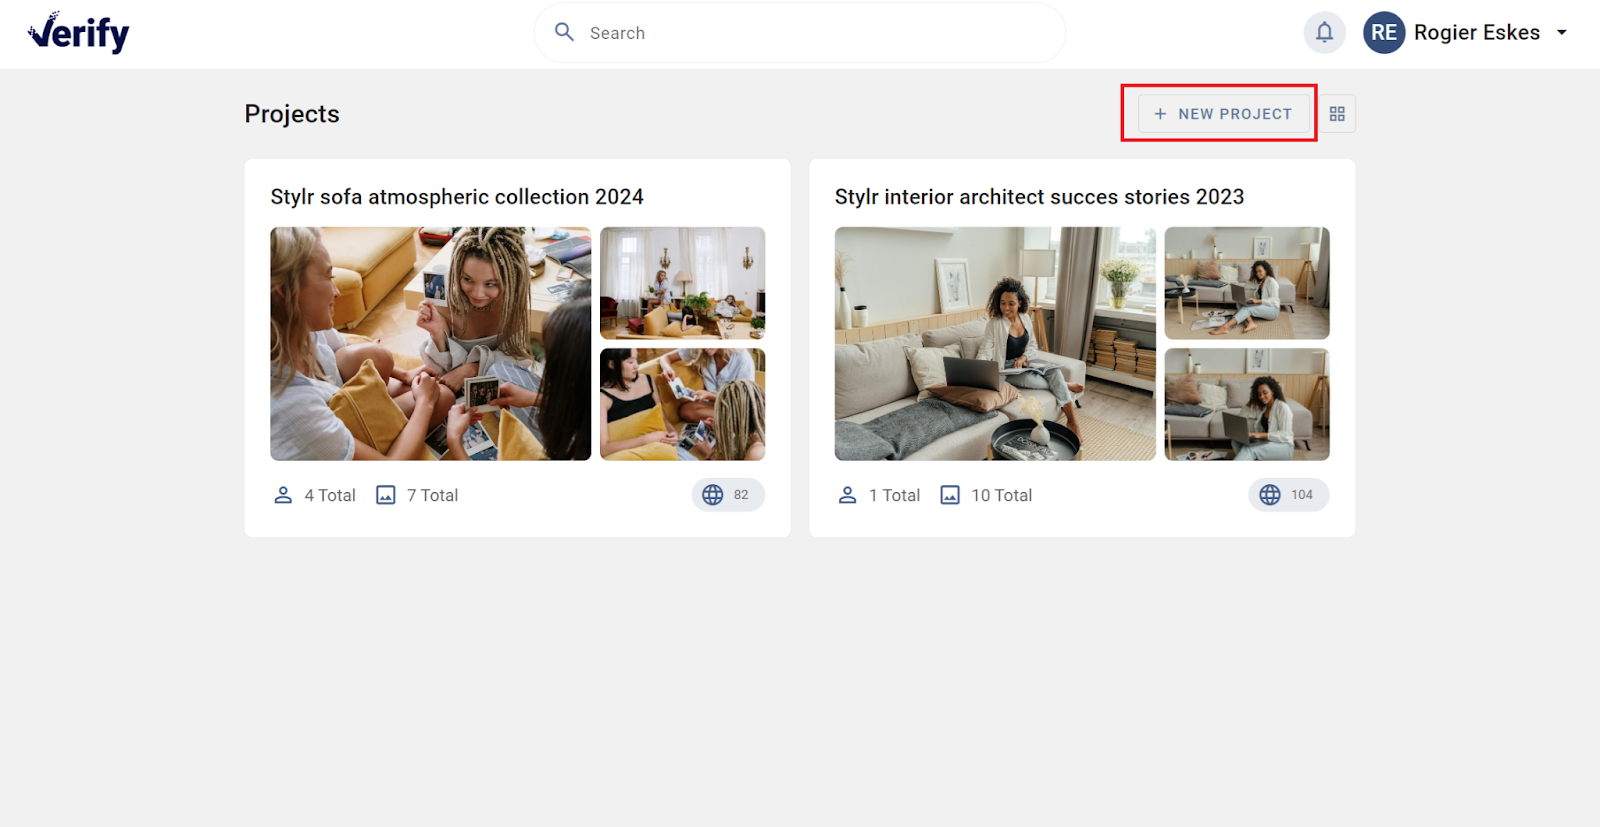
Click on the logo in the top left corner to be taken to the home page. Here you click on the button ‘+ add new project’.
Print screen ‘add new project’
Add project fields and settings
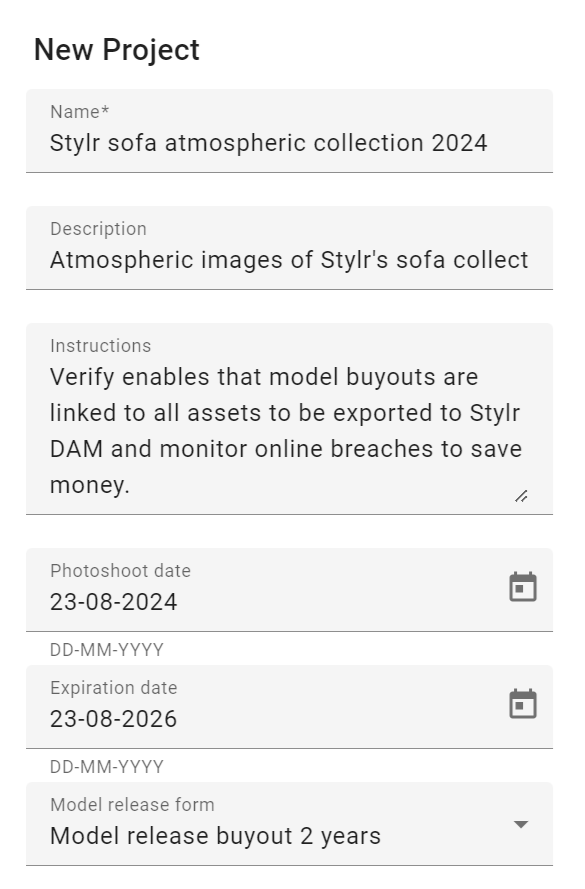
Now a popup will appear in which you will add the following fields:
Print screen ‘project fields 1’
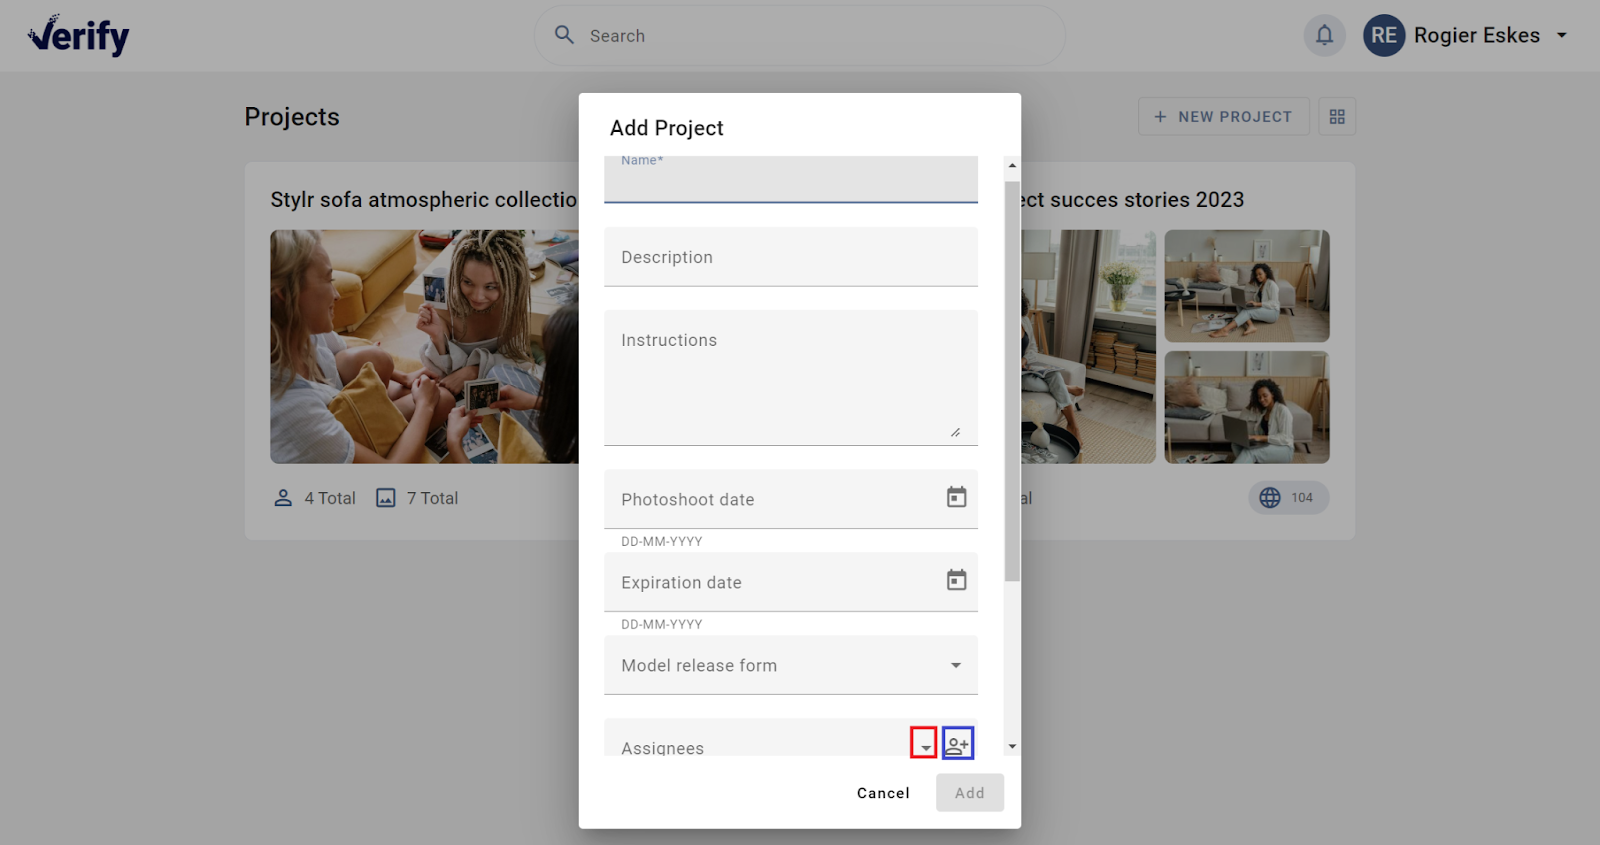
– Add project name (you can search for projects on this name in Verify, in addition, this name will automatically be added as a collection name in the image bank as soon as you start exporting)
– Add project description (this description will automatically be added as a collection description in the image bank as soon as you start exporting)
– Add instructions here you can fill in the instructions / briefing to e.g. the photographer that appears on the project page
– Set photo shoot date
– Set the expiration date for the project’s consent
– Assign the consent form templates to the project (forms you want to use in this project)
– Add the stakeholders to the project who need to be able to work in this project, via the dropdown icon (outlined in red) you can assign existing Verify users. If the user is not yet available on Verify, you can directly invite/create him (outlined in blue) for Verify and the project. Users will receive an invite email with the project link.
Print screen ‘project fields 2’

–Enable revoking on/off Indicate whether or not models are allowed to withdraw consent themselves by toggling this feature on/off.
-Automatically resize incompatible images
In the project settings (when adding a new project) you now have the toggle to turn ‘automatically resize incompatible images’. This will resize the incompatible to 6K fingerprinted assets automatically. In the past sometimes photographers needed to resize images manually before uploading which cost extra time. Now this can be done automatically.
–Set project permission(s) you need to grant to the project, these permissions will ensure that the project collection in the image bank is only available to key users with these permission(s). See ‘3.3 Setting permissions for export to the image bank’
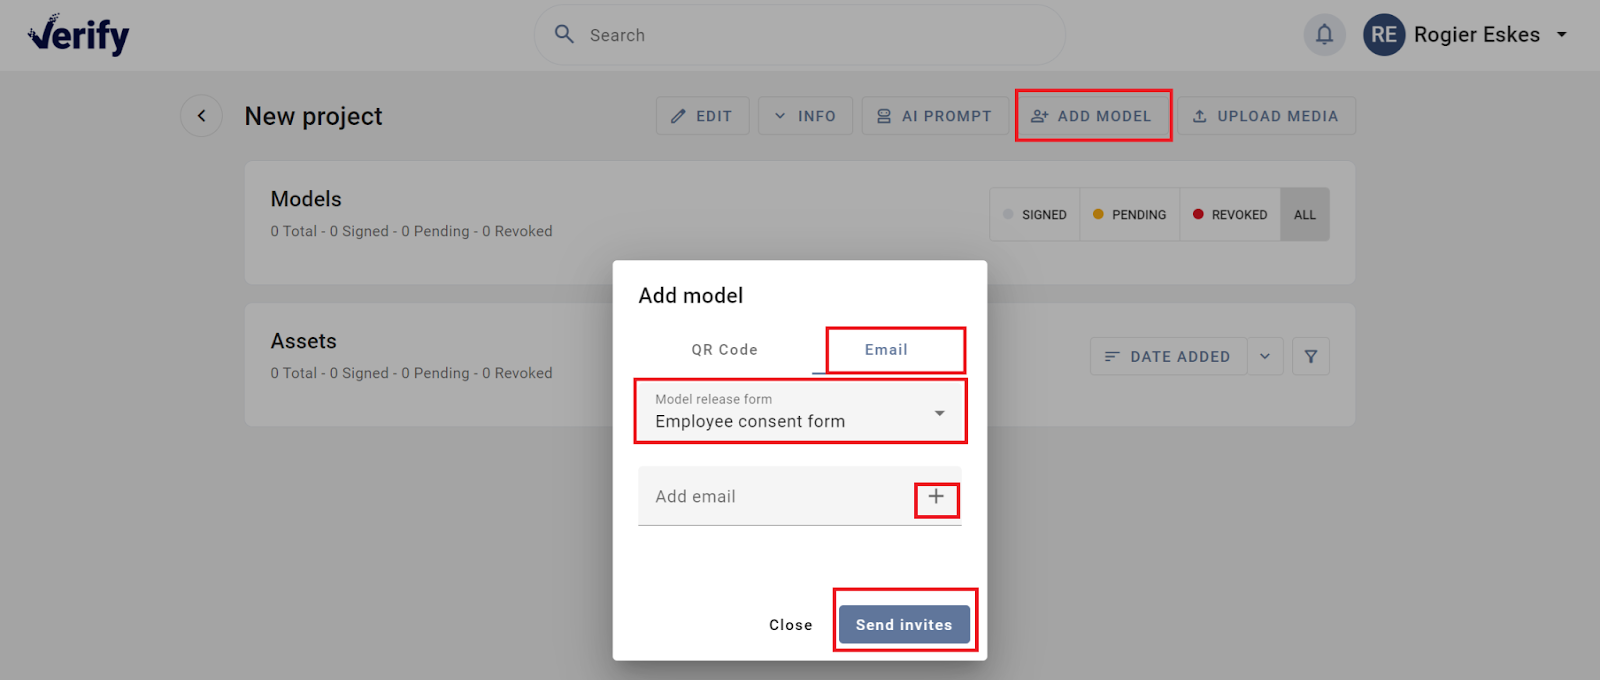
Pre project invite models for photo shoot
If desired, you can also send the models a notification email prior to the photo shoot with the link to sign their digital permission. You do this as follows:- Go to the relevant project page – Click on ‘add model’- Click on the ‘Email’ tab- Choose the desired consent form- Enter the email address and click on the ‘+’ icon- Check if the email addresses appear in the list- Click on ‘send invitation’ to send the invitation notification email to the models with the link for the digital signature
Print screen ‘pre project invite models’
Edit project
On the project detail page, click on ‘edit’ and then ‘edit’.
Print screen ‘edit project’
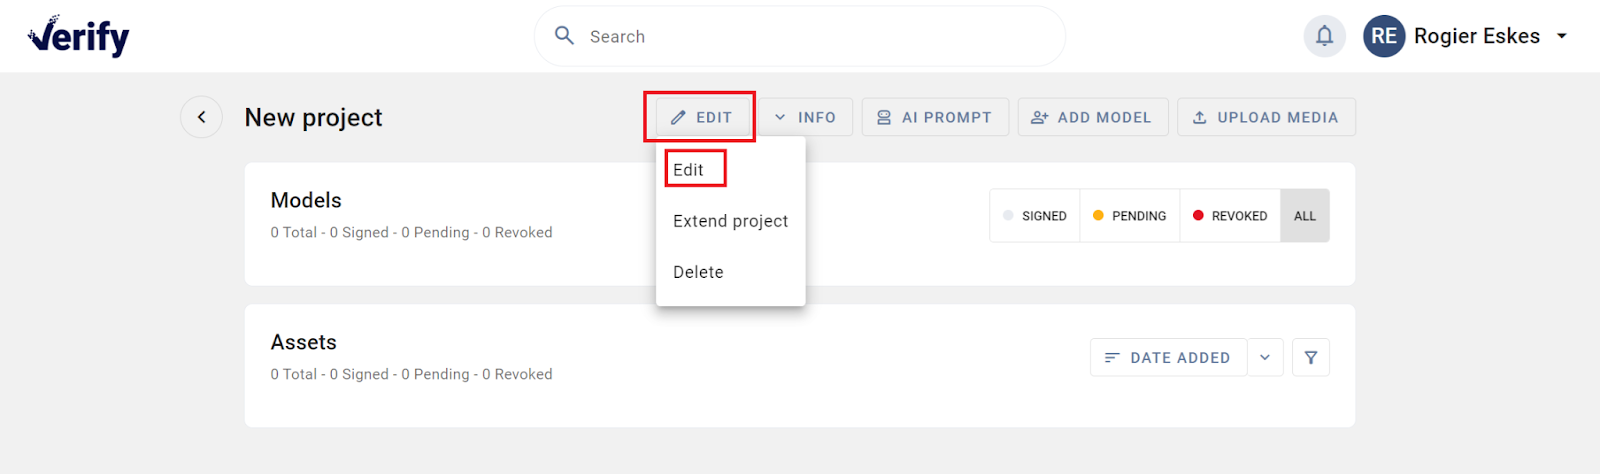
Delete project
Please note: if you delete projects, all consent and images for this project will be permanently removed from Verify. So first coordinate internally whether this is allowed. As of this moment, compliance monitoring on images that are based on consent / rights is no longer available and images can no longer be traced via the fingerprints. Images from your organization of these people may now appear online while the consent has expired or been withdrawn without being traced by Verify.
On the project detail page, click on ‘edit’ and then ‘delete’.
Print screen ‘delete project’

Tag (link) model consent to assets
Once all consent of the models in this photoshoot project have the status ‘signed’ and all images have been uploaded by the photographer, the consent will have to be linked to the images in the project.
Please note: one unique e-mail address is used per model for the consent confirmation
Tag model(s) per asset
Go to your project and click in the asset block on each image you want to link model (consent) to, click on the face of the person you want to link permission to. In the list, click the appropriate model. If you want to remove the link, click on the model in the model list below the photo and remove the model tag in the photo by clicking on the cross.
Print screen ‘tag model per asset’

Linking models to multiple assets at the same time (bulk action)
By holding down your left mouse button and dragging over the assets, you can select multiple assets to which you want to link models/consent. You can also press ‘control a’ to select all assets in bulk.
Now the multi edit taskbar appears, allowing you to link models to the selected assets in one go. You can do this by clicking on the ‘tag model’ button.
Print screen ‘bulk tagging models to assets’

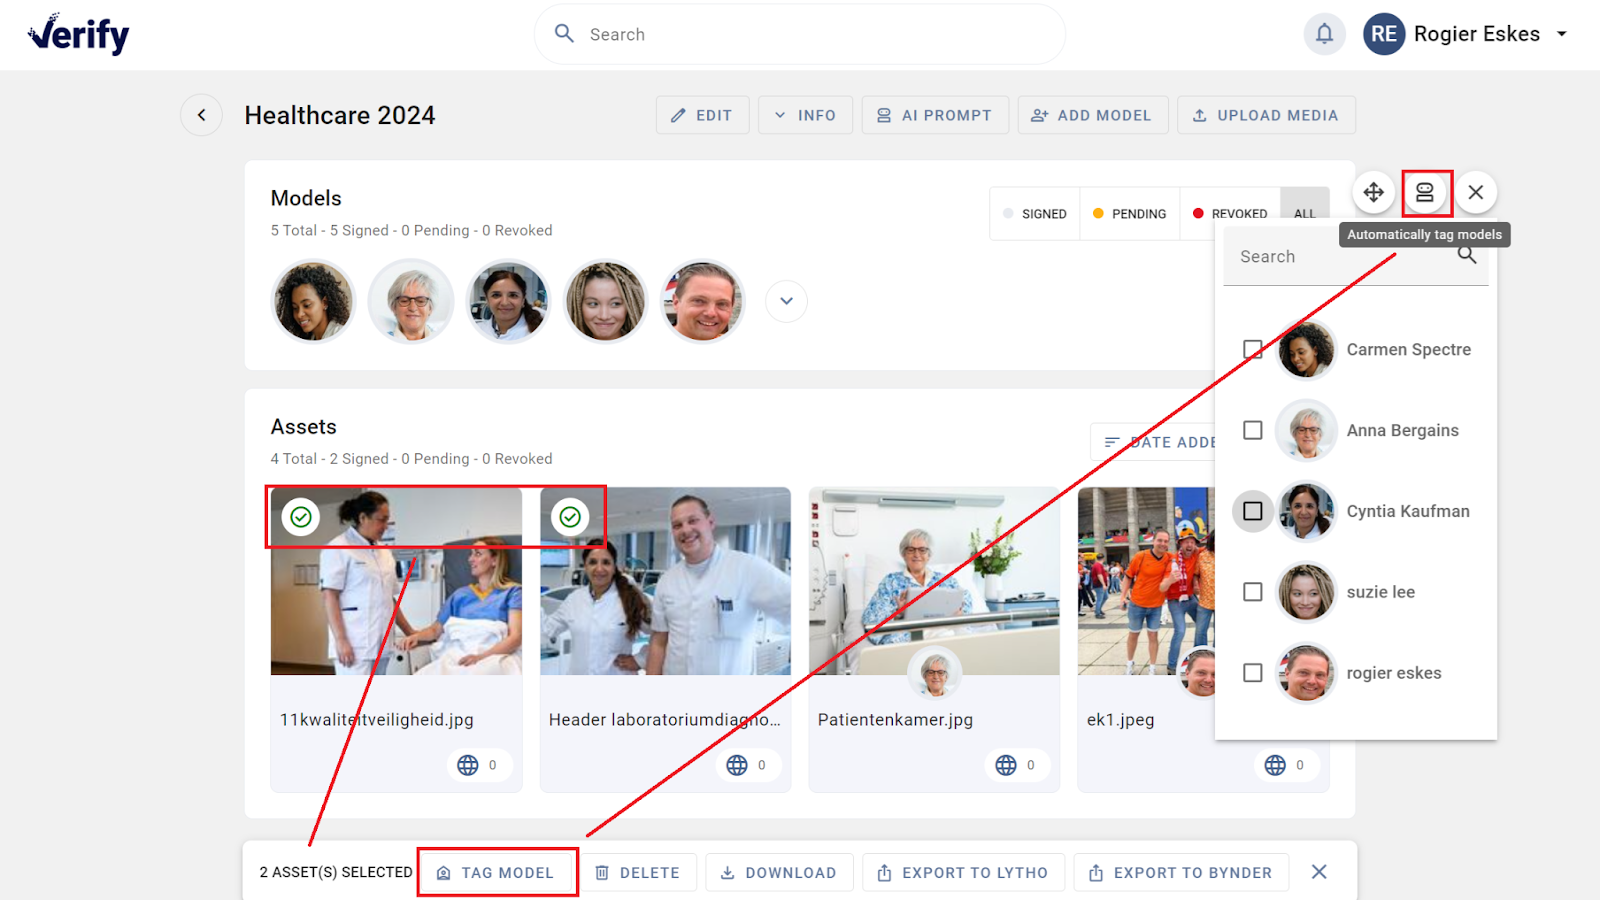
Auto tagging (linking) of models to assets
By holding down your left mouse button and dragging over the assets, you can select multiple assets to which you want to link models/consent. You can also press ‘control a’ to select all assets in bulk.
Now the multi edit taskbar appears, allowing you to link models to the selected assets in one go. You can do this by clicking on the ‘auto tag model’ button. Based on face recognition Verify will automatically add model suggestions to the asset.
Please note that for the best face recognition results, the Selfie needs to meet the following requirements:
1-Look straight into the camera
2-Face is clearly recognizable
3-In normal colour mode with no filters applied to it
Print screen ‘auto tagging models to assets’
Export Verify photoshoot project
As soon as the photographer has added all ‘signed’ consent and images within the project and the project manager/admin has linked all consent to these images, you as a project manager/admin can export the project to the image database (DAM).
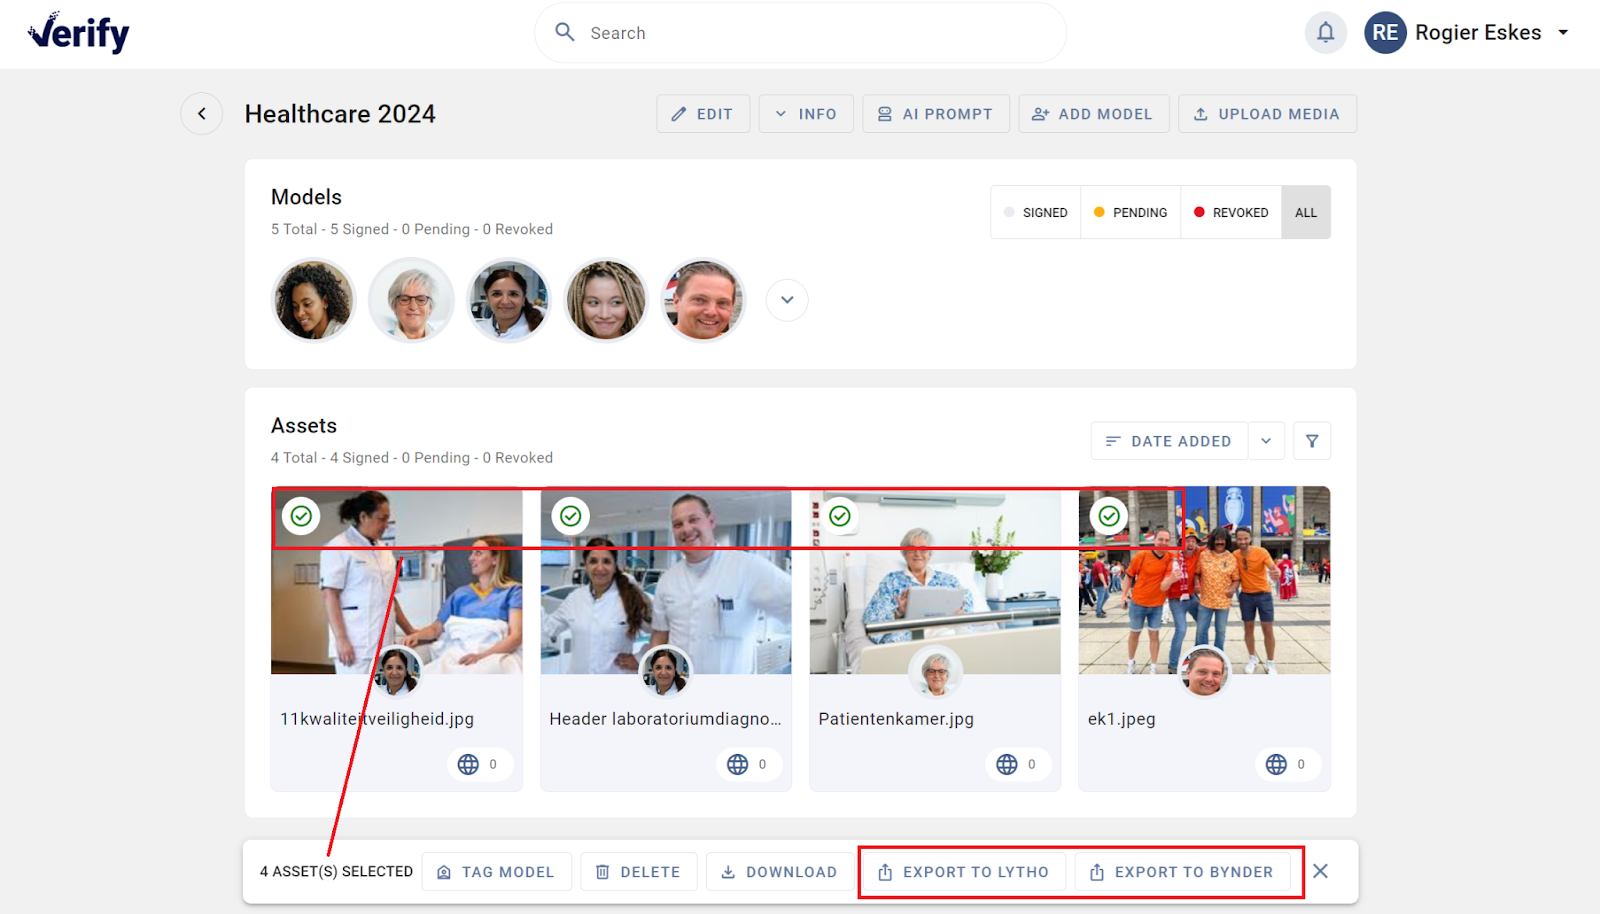
Export Verify project to the image library (DAM)
Select an asset by checking the box at the top left of the asset tile.
You can also select multiple assets by:
- Left click and drag over the assets you want to select or press ‘control a’
- If you wish, you can remove assets from your selection by unchecking them
Once you’ve selected assets, the action bar will appear to export them. Click on this ‘export to Lytho or Bynder’. Next, a spinner will appear in the action bar indicating that the export is running.
Print screen ‘Verify project export to DAM’
Publish Verify project images in the image bank (DAM)
As soon as the export is finished, the ‘view collection’ button will appear in the action bar. By clicking on this, you will automatically be sent to the collection in the DAM solution and you can provide the images with the desired tags and permissions to make them available in the image bank for users.
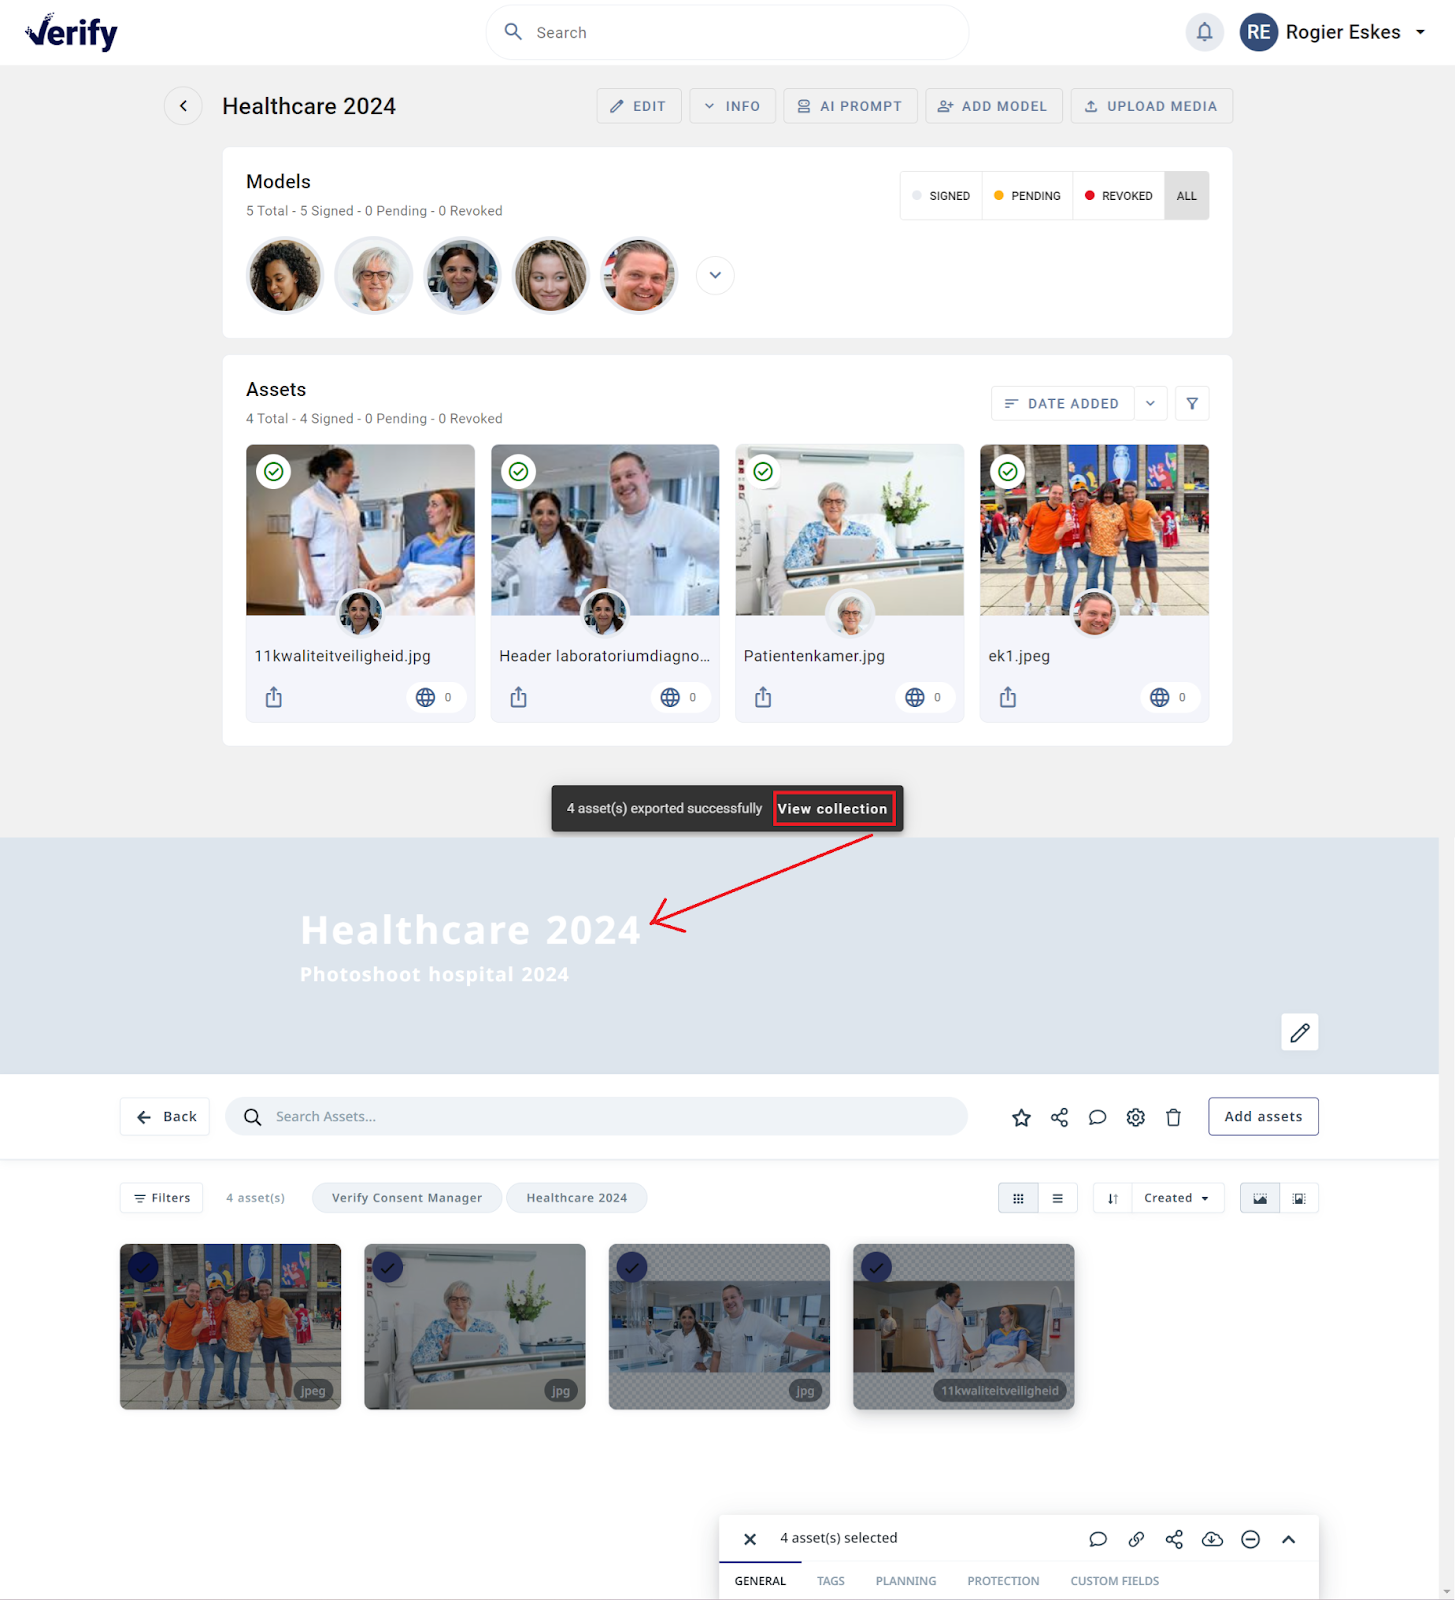
Print screen ‘export Verify project to DAM collection’
Set up pin search for collections in DAM solution
In the collection overview in DAM solution, Key users can click on the tag ‘Verify consent manager’ if desired (and possibly save a pinned search) so that you only see your own Verify photoshoot projects.

Print screen ‘DAM pinned search for Verify projects’
Manage Verify digital consent for linked images
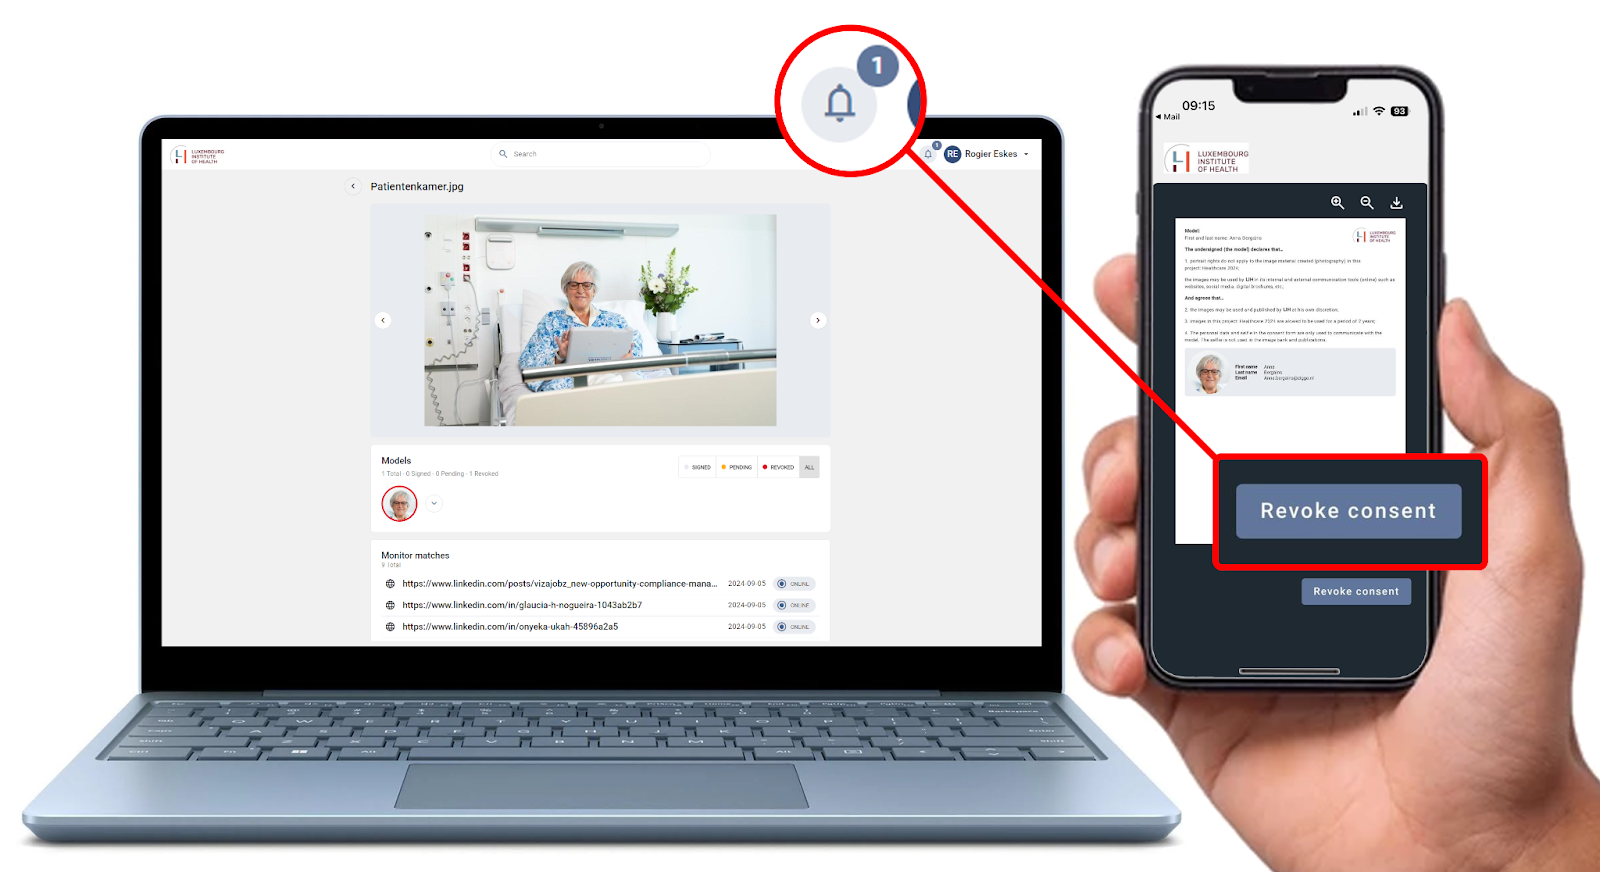
Model revoke consent in Verify themselves
Model revoking, a model can revoke Verify consent themselve via their own Verify digital consent page by clicking on ‘revoke consent’. The link to the digital consent is sent out to the model once they have filled in the digital consent form.
As soon as a consent has been revoked by an employee, you as a project manager (key user/faculty admin) will receive an email notification from Verify with a link to the digital consent for this person in the Verify consent manager. Here you will see an overview of the images that are still used online and should be removed from the internet. At the same time, Verify will automatically block all images for this person in the image bank (DAM).
Print screen ‘models revoke consent themselves’
Revoke consent for a model as a project manager
Suppose someone sends an email or calls with the request to revoke a person’s consent. Then as a project manager (key user/faculty admin) you can look up this person in the Verify permission manager, go to this person’s permission page and revoke them as a project manager (key user/faculty admin).The person in question will then receive an email confirmation from Verify that the administrator has withdrawn his permission and that all images in question will be blocked in the DAM and taken offline.All images are then automatically blocked in the image bank (DAM) by Verify.
Print screen ‘Revoke consent as a project manager’

See revoked assets which are published online
By clicking on the revoked person (red icon on their avatar) in the model list, you will now see all the images that are linked to this model. Now click on the sorting tab ‘active online’ and you’ll see all assets that still are used online on the internet/socials.
Print screen ‘revoked assets which are active online’

See online locations for a revoked asset
By clicking on the asset you can see the monitor matches, on how many locations an asset is found active online. When clicking on the asset you will see a list of all the locations where the asset is found and need to be removed. You can click on the link to see the location.
Print screen ‘online monitoring results of a revoked asset’

It is also possible to go from the image bank (DAM) to the person’s Verify digital consent page. You do this as follows:
In the image bank, as a project manager (key user/faculty admin), search on the tag ‘Verify consent manager’. Next you can search on the name of the project. If you prefer you can also add a pin search in the DAM (for the tag ‘Verify consent manager) so you can have a direct overview of all assets with digital consent linked in Verify.
Print screen ‘search for models with digital Verify digital consent in DAM’
Then type the name of the person in the search bar and press enter. Now you can see the images with digital permission from this person. Click on one of the images and go to the ‘meta’ tab. Here you can see the link to this person’s digital consent in consent manager. Click on this link and here you can see the contract for the model or revoke the consent for this model.


Print screen ‘go to Verify digital consent page from the DAM’
Subsequently, all images are automatically blocked in the image bank (DAM) by Verify. By clicking on the person on the permission page, you will also see all the images that are still online on the internet. The person in question will then receive an email confirmation from Verify that the administrator has withdrawn his permission and that all images in question will be blocked and taken offline.
Send a consent project extension request
Send project extension requests to models as a project manager. As soon as a project is going to expire, you as a project manager will receive a notification by e-mail (you can set the term as an administrator with user management role, see 3.5).
Go to the relevant project for which you want to send extension requests to the models.
Print screen ‘send project extension request to models’
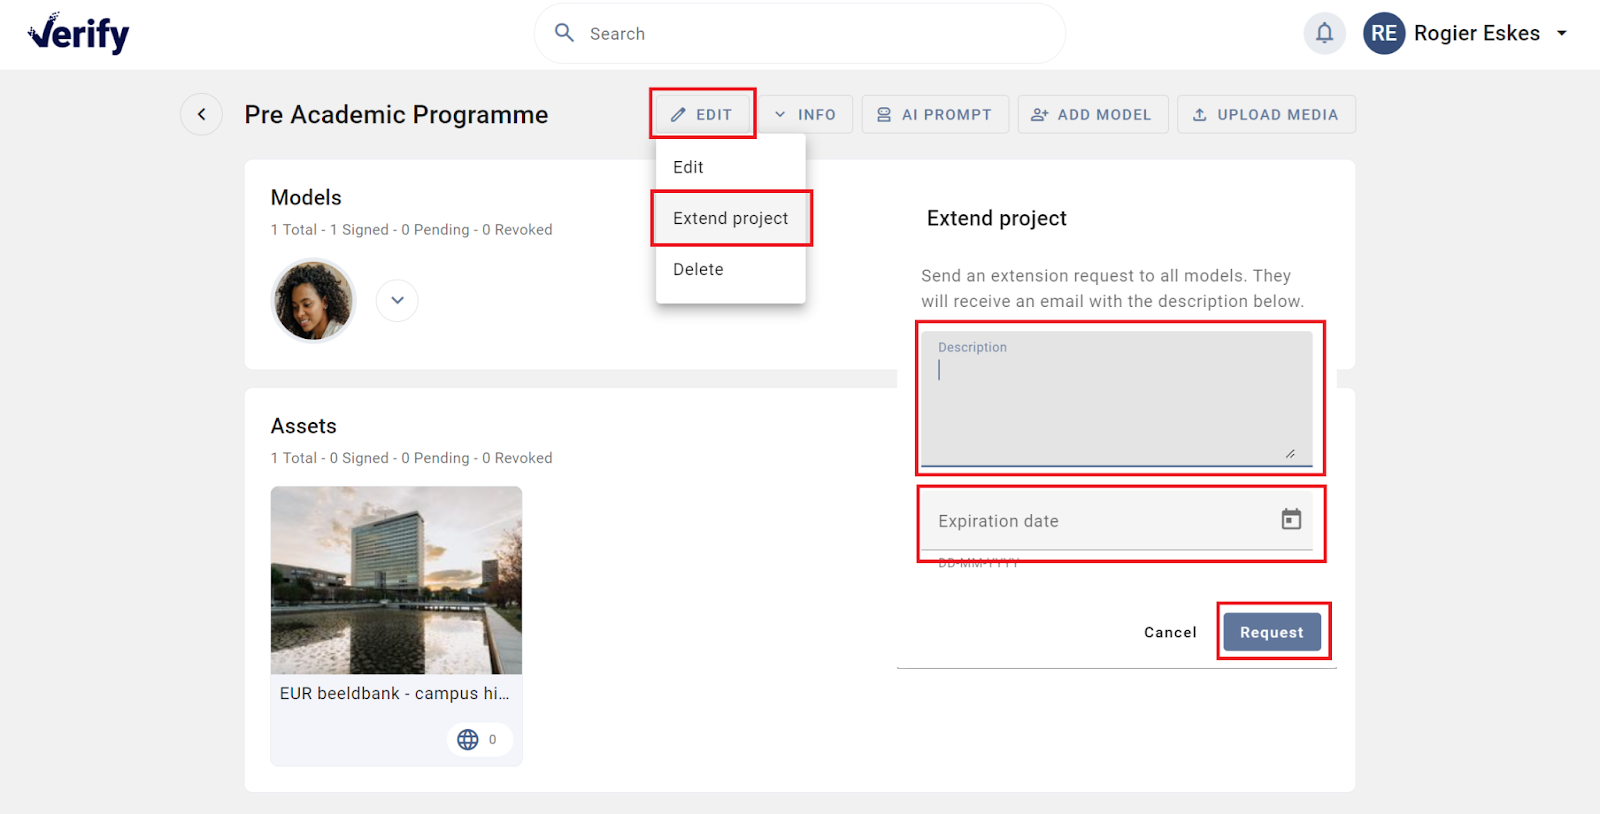
On the project page, click on ‘edit’, ‘extend project’. Now a popup will appear in which you fill in the following things:
– ‘Description’: here you fill in the text that will be added to the models in the email.
– “Expiration date” means the new consent end date
Finally, click on ‘request’. An email will now be sent to all models asking them to renew their consent. In the email there is a link to their contract where they see a button ‘confirm renewal until {{new expiry date}}’. In the model list, the designs are given the status ‘renewal requested’, once the renewal is confirmed by the model, it gets the status ‘signed’.
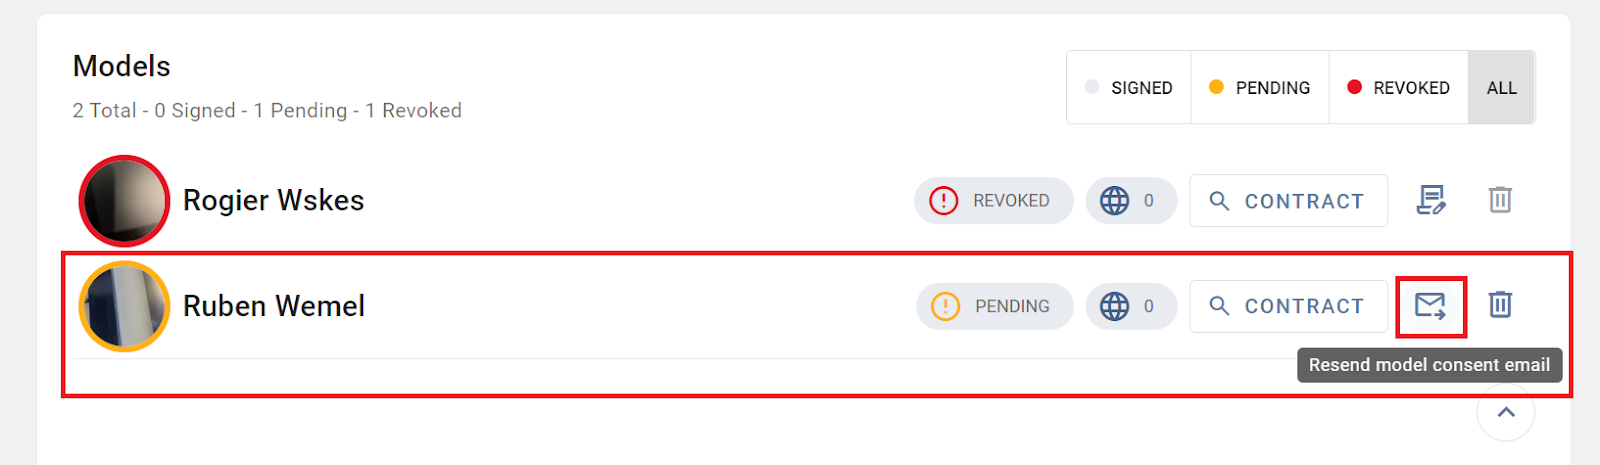
Send pending models a reminder to sign their consent
In some cases models forget to confirm their consent or consent extension. They accidently deleted the confirmation email to confirm their consent. These models will still have the status ‘pending’.
In the model list, the project manager now has the function button ‘resend model consent mail’ for pending models. When clicking on this button a consent confirmation is sent again to this model.
Print screen ‘send pending models a reminder for consent approval’
Getting Started as a Photographer (Uploader)
Find and open a project
Bring your laptop or mobile device that is connected to the internet to the photo shoot and open the correct project page. In the Verify portal, the photoshoot projects for which you have been assigned will appear. If you are an external photographer you probably received an invite mail from Verify with the project link included.
Open a project
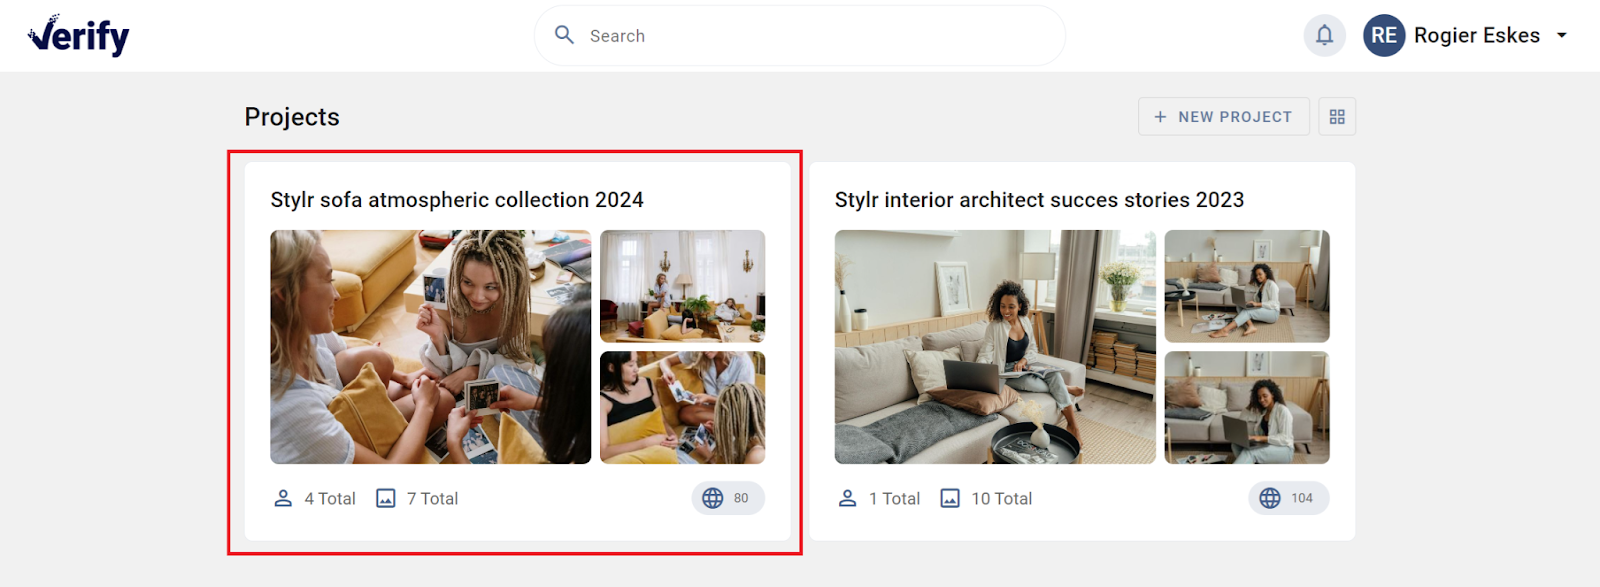
In the Verify portal, the photoshoot projects for which you have been assigned will appear. Click on the project tile ‘Photoshoot Euro 2024 in this example’ to open it.
Print screen ‘open a project’
Project page
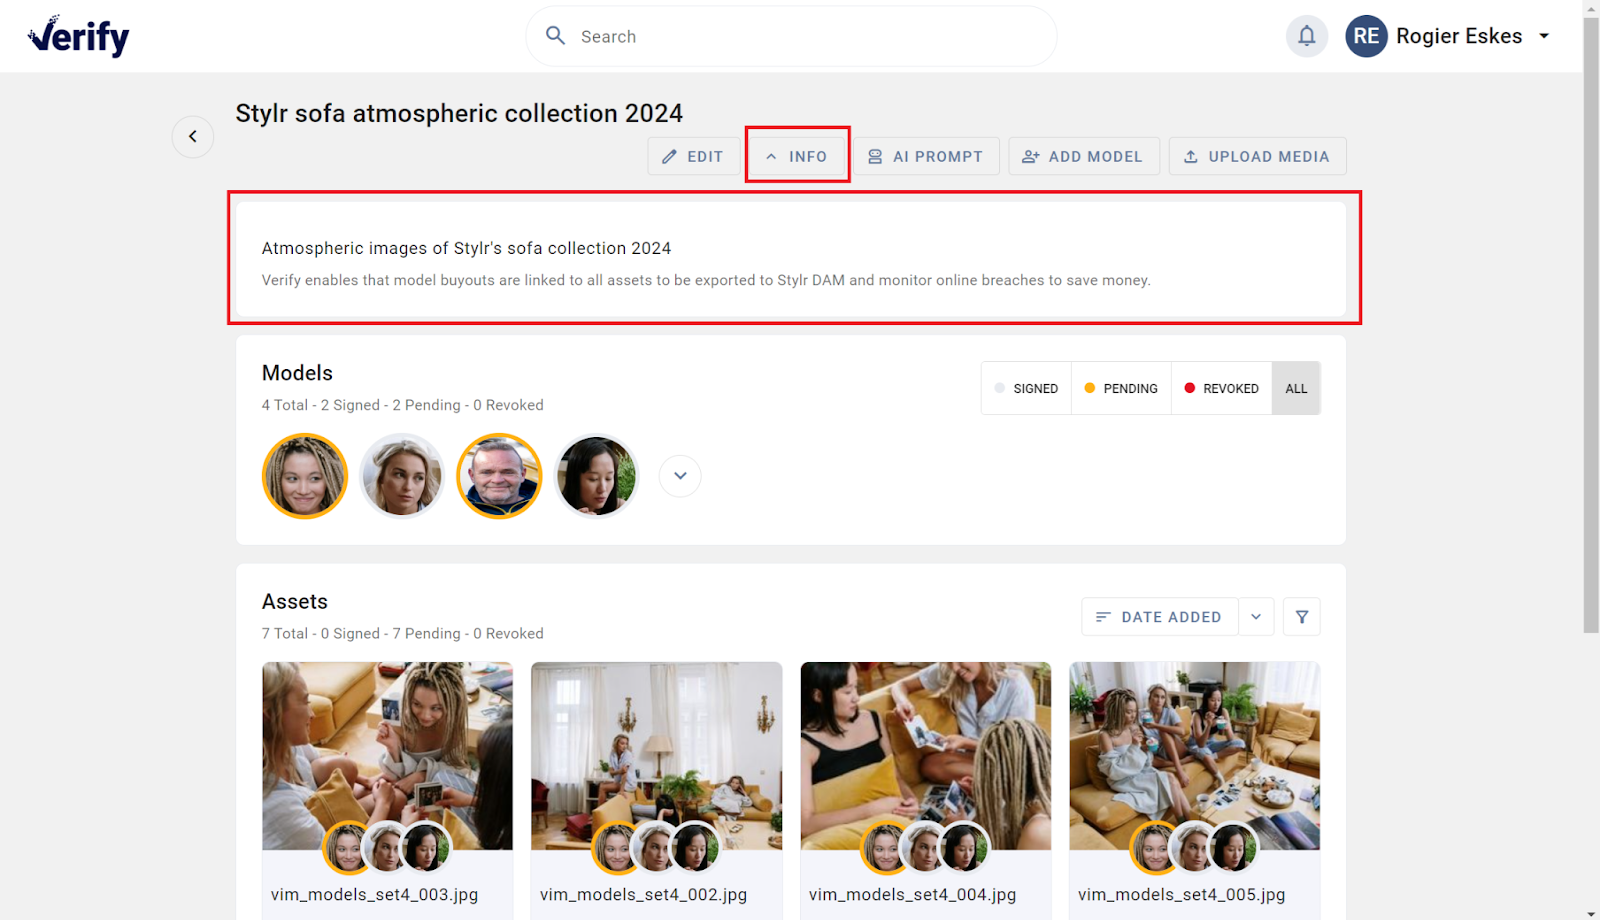
If you click on a project, you will be taken to the project detail page. By clicking on ‘more info’ you can find instructions that the project manager/admin has filled in for you.
Print screen ‘project page’
Adding and signing digital consent form by models
Offering digital forms to models (add model)
The first step is to ensure that all models (those portrayed) at the photo shoot have digitally approved their consent. Adding consent is done as follows:
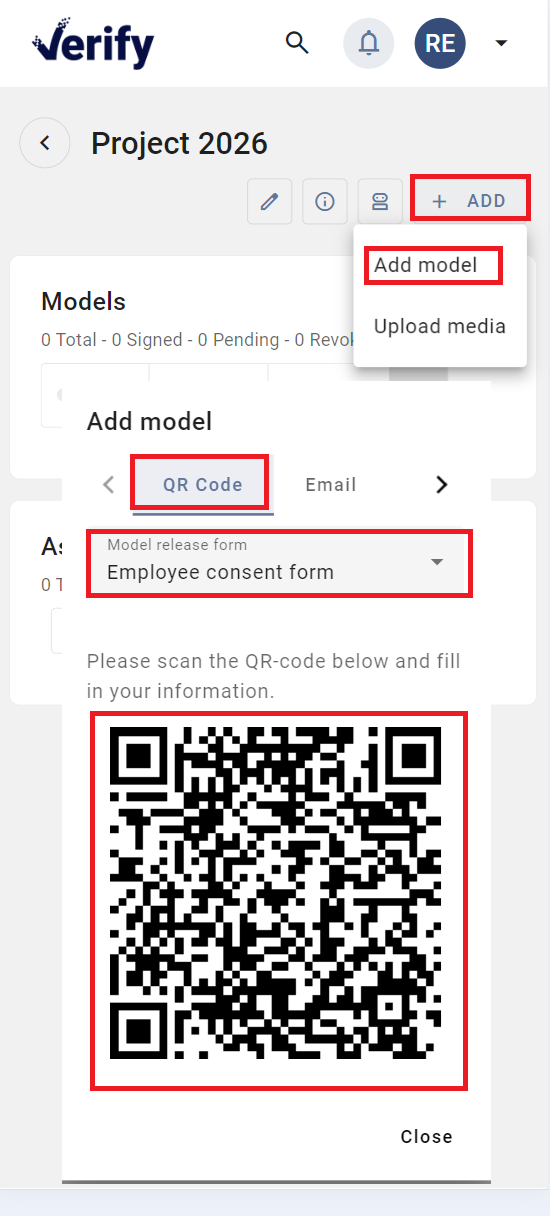
1- Click on the ‘add model’ button
2- Select the correct consent form
3-Now the QR code will appear that the models have to scan with their mobile to sign the digital consent form
Print screen ‘adding model consent’
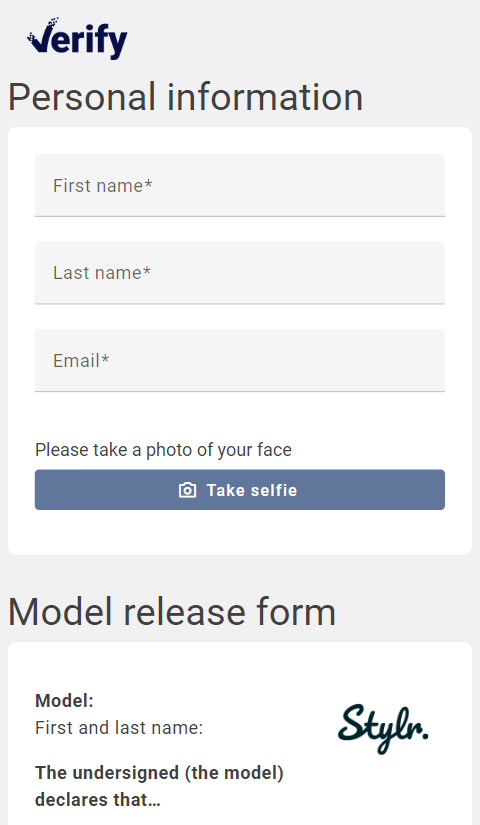
Digitally signing consent form by models
After scanning the QR code the model will now see the digital form on their mobile phone, which they will have to sign. They fill in the fields for name, surname, email address and take a selfie after which they click on the ‘send information and confirm’’ button.
They will then receive an email with a link to their digital consent to confirm it definitively. In the email, they click on ‘view contract’ and then on ‘confirm signature’ on this contract page.

Print screen ‘digital signing consent by models’
Check if all models have signed their consent
Once models have signed their consent, you will see them appear in the model list in the project page. Click on ‘arrow icon’ to see all models. You can easily open the project page on your laptop or mobile phone to validate if all models are present and have signed their consent. You here can filter on ‘signed’, ‘pending’ and revoked status.

Print screen ‘Model list to visually validate signed status’
Resend confirmation email to pending model
Now you simply need to visually check via the name and avatar in the list whether all the models on the photo shoot have signed their consent. All models in the list must therefore have the status ‘signed’. You can filter on ‘signed’ in the list. If they haven’t gone through the confirmation email, the status is still ‘pending’. You can directly resend them with the consent confirmation to let them sign off.

Print screen ‘Send confirmation mail’
Upload and fingerprinting assets
Now that all the models have signed off their consent,, the photos can be taken.
Photo files that you are going to upload must meet the following requirements:
JPEG or PNG
6000*6000 is max resolution
15 MB per photo is max
You will have to upload all necessary (post-processed) photos in the project. You can do this by clicking on the ‘upload media’ button in the project page. You then select the photos you want to upload from your device.
Print screen ‘Upload assets in project’

Fingerprinting uploaded assets
Now all images in the project will appear under the assets. All uploaded assets will appear with a web icon on the asset tile. This means all the assets are now automatically provided with Verify fingerprints and will be tracked online.
If an asset is not supported by Verify it will be removed after upload and the uploader will receive a notification in the upper right corner. If you click on the notification you will see the asset preview, filename and the reason why the asset could not be uploaded to Verify.
Print screen ‘Uploaded and fingerprinted assets’

Once all photos in the project have been uploaded with the status offline, the photographer’s work is ready for this project.
The project manager of the Verify environment will take up the project further.